Guitar restoration - Part 8 - The inlays
As this guitar won't ever be the same as it was, why not put my imprint on it? Customizing the rosette would be how the masters are doing it, but I'm just a newbie, so the easiest way to do it is having custom inlay(s). The headstock surely can receive something, as it's quite empty, it never had anything on it. But the fingerboard also looks plane, so why not customize that, as the frets are off, it was radiused, but a couple more strokes can't hurt. So adding a 12th fret marker would be the nice thing.
After some thought I decided that the topic of this guitar is renaissance/new live/etc. So the inlays will be around that theme:
Headstock inlay design
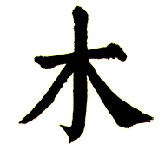
The headstock inlay will be the chinese mu symbol, meaning wood and also wooden/made of wood (see google translate). That's completely true for a guitar. But in a broader vision, namely the chinese five elements philosophy "The
Wood Element is the energy associated with regeneration, renewal, and
growth. The season of Spring expresses this rebirth as the blooming of
new life, the continual movement of Chi. The Wood Element expresses the vision of life, direction, and movement." (https://www.ancient-symbols.com/chinese_symbols.html).
"The
Wood Element is the energy associated with regeneration, renewal, and
growth. The season of Spring expresses this rebirth as the blooming of
new life, the continual movement of Chi. The Wood Element expresses the vision of life, direction, and movement." (https://www.ancient-symbols.com/chinese_symbols.html).And the above thing also stands for this guitar, like regeneration, and renewal, blooming of new life, rebirth. On another front however, it also represents me, in the context of vision of life, direction, and movement, as in working with wood and guitars I have found a new hobby, which probably is a new direction I'll be following for some time.
Fretboard inlay design
 The 12th fret inlay will be a phoenix (yes, that's a cliche), also representing rebirth, and fire (my passion). I know it looks like a bird, but having the fine details of a phoenix on a fretboard needs some really precise skills, so I'll be happy if I manage to do this. After some explanation you can understand that the bottom part is the tail, but also looks like a fire, so let us imagine that this is a real phoenix disguised as a dove. The design is based on a mash-up from several phoenix images, adjusted to fit my needs (wider, not so tall, shorter tail, no very fine details), done with Inkscape and scaled to fit the fretboard, and have the two larger parts (head and part of the tail) hide the holes for the previous standard round fret markers.
Headstock inlay using saw-dust and white glue
 |
| Dremeling the channels |
 |
| The logo before cleaning |
 |
| Ugly mess on the headstock |
I have traced the design onto the headstock, started with a cutter knife to mark the outlines, then went with a small dremel bit to clear the channels. After mixing some reddish saw-dust (made by sanding some beautifully looking wood crust) with white glue until it became a creamy something, I have stuffed the cream into the channels created (creating an ugly mess) inside and around the channels, which was a bit scary.
Tried to scrape off the top before it cures, but I ended up scraping out too much material given that I was trying to scrape something with a lot of glue in
it, so I refilled the channels, and left the ugly mess piled up over the logo. When it finally cured, took most of it off with a cutter, then sanded the rest with 180 grit, then 220 grit sandpaper, finishing with 500 grit, then cleaning the logo with a toothbrush.
Fretboard inlay using wood and superglue
 |
| Tracing the design onto the fretboard |
out the phoenix, and used the rest of the paper as a template, to draw the design onto the fretboard after properly positioning it. With this done, I have cut around the outline with a cutter (not too deep) to have a "barrier" while using the dremel, as I was dremeling free-handed, and that helped the wood chip off when I was near the edges, so I didn't leave the area I had to dremel out.
 |
| Inlay material and inlay slot |
 |
| Rough-cut pieces glued |
 |
| Superglue+sawdust mess to clean up |
As around the inlay due to the superglue there were some white marks, I have scraped the inlay and around the inlay removing most of the superglue until the result was acceptable, cleared the inlay with a toothbrush, and put some superglue all over the inlay to harden it some more, waited until it cured, then re-scraped and re-sanded it to its final form. Not perfect, but pretty close for me (sorry for the blurry image, it was 2AM, probably too dark to take a clear picture).
 |
| The fretboard inlay |


Comments
Post a Comment